Sunday, March 6, 2011

Purple Cake Tutorial

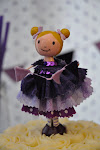
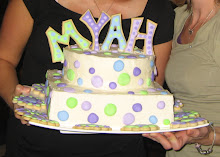
My daughter had a purple party.  She really wanted a cute dolly girl for the top of the cake so I decided to keep the outside of the cake simple.


Clothespin dolly girl!  She was so fun to make and I love how she turned out!  I used beads to make her hair.


The big surprise was the inside of the cake....


On the night before the party I was losing steam, I still had some decorating to do and I was tempted to ice the layers with white icing.  I am so glad I didn't.  I think the colored icing helps to make the look more dramatic!


You can make this cake too.
 In any color you like.
 Without too much headache.

I baked the cake(s) the week before.  This way I was able to bake them, wrap them up and freeze them and not have as much to do the night before the party.  I prefer to freeze my cakes for at least 24 hours before I decorate them.  They are easier to ice and cut and I think it makes it much more moist.

I mixed a small amount of white cake batter with wilton icing coloring.  I mixed lots into the first one to make a really rich, dark shade.  I baked this in a 6 inch round pan.  Then I took another small amount of cake batter (maybe 1 1/2-2 1/2 cups...I didn't measure!?) I added a bit less color to the next and a bit less as I went.

The night before the party, I mixed about 1/2 cup of icing in each of the shades of purple.   I made sure the cakes were even by slicing the rounded tops off the cakes.  I stacked the cakes and iced them with the appropriate colored icing between the layers.

I iced the whole cake with a crumb coat (icing made a bit thinner with a little bit of water.  This layer  will get crumbs in it but that's okay because it is not the final layer:)

Then I popped it in the freezer for 20 minutes.

Here's my lame {it's late, the lighting was bad, I was tired...} photo of my cake with the crumb coat on, all ready to be jazzed up!


Here's the tip that I used to make the rosettes.  It's just a swirl movement.  Here is a tutorial if you don't know how to make a rosette.  This tutorial is great for a few other little icing/piping bag tips!
My rosettes are much bigger than hers but it is the same concept. 
Why is her icing so white and mine a bit yellow?  Because she used Crisco instead of butter.  I personally find Crisco gross, unnatural and well, disgusting.  That's just my opinion.  Lots of bakeries use Crisco and people seem to enjoy it just fine:)


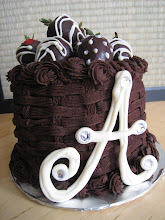
And WA-LA!  Cake is done, ready for a spectacular presentation at the party!!

Saturday, December 11, 2010

Adorable Gift! Little Pastry Chef Set

I was at a craft fair last week at KCS and at the table beside me Shelly had the most adorable gift sets on display.  This is a fantastic product, all hand sewn and for a really great price.


Here is the list of what the set includes:


Apron
Chef Hat
Decorating tube
Large and small cake in yellow (the cakes have zippered bottoms for storage of the accessories)
Fondant sleeves in pink, white and brown for both small and large cake
Fondant caps in pink white and brown for both small and large cake
White ruffle “icing” for both sizes of cake
10 violets
5 roses
7 white swags

It is all packaged in a cute white with pink dots (or plain white) cake box.

The price is $30 for the set!

You can contact Shelly by phone

(250)575-2648

or email


Hurry before they are all gone!


There are other adorable ad ons that you can request:


Birthday candles ($1.50 each)
Strawberries and Whipped cream dollops (5 strawberries & 5 whipped cream for $6.00)
Roses in white, pink, yellow, etc.($1.00 per rose)
A footed cake plate ($6.00)
Assorted shapes such as hearts, dots, stripes, etc.


The cakes are yellow and there is a solid wooden box inside.  The bottom is zippered shut so that you can store all the accessories...SO CLEVER!

The colored "sleeves" and fondant drippy looking tops can create so many different looks.  What a fun toy!


Love the felt piping bag and chef's accessories!


How cute is this???

It would look great on a shelf in a room as well.  SO sweet!


Wednesday, October 27, 2010

Vintage Tea Party Treats

 Last weekend I threw one of my daughter's a 9th birthday "vintage tea party" stye.  You can see details HERE.


It was so fun to put on my apron and do a bit of baking for the party.
It's been a while.
Like a looong while!


Here are the pretties and their stats...


 The cake was actually not cake at all.  My daughter requested brookie.  
Have you heard of it?  
It's all Bakerella's fault. 
 My family will never be the same.  We all love this little delight!


I couldn't imagine the brookie without the ganache top layer so I iced each layer with ganache and then iced the entire outside of the cake with ganache as well.  It was quite easy to ice the cake with icing once the ganache was solid.  I sped up the "get the ganache solid" process by sticking the whole cake in the freezer for a little bit.

For the record, this cake took 3 brownie mixes and 3 cookies mixes.  The bottom layer is two 8in. rounds and the top layer is 2 6in rounds.


 Sugar cookies, I must say, are really adorable but a lot of work.  I was highly motivated to make these because it has been a long time since I created anything cute in cookie form but I am sure I will take a break now, it's just not my thing.

The packaging was easy and I was really happy with the finished product.

I use the "No Fail Sugar Cookie" and "Antonia 74" for my cookie and icing recipes.   They are great and the cookies taste awesome every time.


Here is my easy little cookie display.  If I were to do it over again I would have attached the cookie bags to the ribbons in a classier way.  I used safety pins out of convenience {and maybe a little impatience} but imagine how cute they'd look with wooden clothes pins!


Saturday, August 7, 2010

Sweets On Vacation


Sorry friends, I have nothing to show you from my own kitchen.  I made some adorable chocolate dipped rice krispy pops and a fun rice krispy cake for a friend but I got no photos!

I did go on a fantastic vacation with my family to Westport Washington and my eye is always drawn to the sweets.  Here is what I saw...

My boy sneeking salt water taffy!

My baby tasting her first candy necklace!

My big girl holding a giant cone:)

Candy sticks in every color...pretty!!

Best mint chocolate fudge ever...YUM!!

Tasty jawbreakers.

The kids were in heaven being allowed to have much more candy than we would normally allow.

Now I need to get busy planning the treats for my upcoming Stella & Dot party.  Got any ideas?

Friday, July 2, 2010

Dunk, Roll & Cool Your Way To Decadent Ice Cream Cones


Check out these delicious cones we made to celebrate the end of school/ beginning of summer.

Here's a quick tutorial that will hopefully motivate you to try them cause they are sooo yummy!

Choose some kind of candy bar or nuts that sound good to you...I went with crispy crunch (Canadian version of Butter Finger)

Melt chocolate in a double boiler.  I went with dark chocolate chips and some unsweetened dark chocolate baker's squares)

Okay enough talking, here's the steps...

Dunk...

Roll...

Cool.  (in the fridge.  Mine are sitting on my silpat in my baking try.  You can use parchment paper if you don't have a silpat.)

That's it!  So easy and it makes the cones MUCH more exciting!!

Go make these!

Here are my kids and their cousins enjoying their cones outside (while the adults gobbled theirs down inside)

YUM YUM!

Tuesday, June 15, 2010

School Cuppies


When my daughter's teacher came back to the school to introduce her students to her new baby, cupcakes were in order.  I used a fun font (school daze) to make cute toppers with the baby's name.  The cupcakes were chocolate with mint icing and grasshopper cookie crumbs on top.  Delish!

Wednesday, May 26, 2010

Owl Cupcakes

Owls are so popular right now.  My next door neighbor growing up had an owl collection (figurines, not pets) so whenever I see owls I think of her.  I kinda associate owls with the 70's. I guess peace signs and owls have re-established themselves in today's pop culture!  Anyways, I came across these adorable cupcakes and I felt compelled to share them.

Looks like they used Oreos, junior mints and some kind of yellow candy.  Easy and sooo cute!  Sorry, I do not know where I found this, it was reeeal late one night.  If you know where I got it, let me know so i can give the proper credit!


Newsflash:  Kim from Frost Me knew where the owl was from...Hello, Cupcake a cute blog dedicated to cupcakes! Oh- she also shared that the nose is a banana Runt candy!  So great! Thanks Kim!

Friday, May 7, 2010

Dirt Bike Cake

One week after we celebrated my daughter's first birthday, I was back in the kitchen baking a cake for my son.  

Lucky for me his request was fairly simple.  He asked for a "dirt bike cake" and that is exactly what he got.

 For me, it's all about the details.  The "dirt bike guy" is #4 and my little guy turned 4!


My lil buddy with his buddies!

Peeking at the cake!

I used chocolate doughnut holes and cocoa puffs and chocolate rocks on this cake.  The path is made from dark chocolate ganache.


This was a fun cake and very forgiving  Best of all, my boy loved it and my husband deemed it "best tasting cake so far"  Double points for me!!

Thursday, May 6, 2010

Cait's Sweets Table

My favorite element of Cait's party (aside from the cute baby of course) was the sweets table.  
Let's face it, candy is CUTE!  


I was so excited when I spotted these mini polka dotted take-out boxes at a party store in the bridal section!

  The morning of the party I gave my 10 year old daughter a pile of ribbon scraps and she tied random matching ribbons on the boxes for a little added cuteness.  I am all about using what we have and usually the best details come together at the last minute!

Oh- and can I just share- those are Victoria's Secret boxes coming in handy again!  If you haven't purchased any PINK items from VS yet, I highly suggest you do so and then ask for a gift box in each size!


I found these Neapolitans and amazing pink rock sugar sticks at Michael's in California.  We don't get some of the really fun stuff up here in Canada. 
They were huge so I cute them in thirds and wrapped them individually.

The tags were a last minute thing as well but I have to share my new trick...The print on the background of the tag was originally the fabric that inspired the party color scheme.  I used this fabric in Cait's tutu as well.  I took the fabric in to the copy store, put it in the top of the deluxe copy machine and made a color copy of my fabric!  Yahoo!  I am so happy with this concept.  If you already knew about this, don't burst my bubble cause I had never heard of such a thing and I am kinda proud of myself for coming up with it!  
Imagine the possibilities?

 The big lollies came with ugly wrappers so I unwrapped them and covered them with celophane and tied them with cute bows.  So easy and it made such a big difference!

Oh- got that vase at the thrift store for $1. Great find!


Circus Animal cookies were a must at this party!  The chocolate covered pretzels were a really big hit as well.  (I took these photos a few hours before the party when the jars still had cellophane on them.  I actually left the cellophane on until the end of the party because there were so many little ones and I didn't want all the favors to be gone before the party was over!)


More of that fabulous printed fabric paper!  I have had this hat box for a long time, I just keep painting it, covering it with paper, you name it, I have done it!  Height is an important aspect of a sweets table so this box was very helpful.


Another view...I was so happy with the bunting.  It was not hard at all and it turned out so sweet!  It is going up in Cait's room now.


Party favors for baby's friends...Bibs and matching stuffies!

 Our Sweet baby is successfully one!